Showing posts with label Solutions to Seams / RichFaces / xhtml. Show all posts

JSF Session Timeout Handling

JSF Session Timeout Handling

Here is the solution for session handling. When your session timed out, you will be redirected to the index page which is commonly the login page to login again.

package com.mypackage.web.session;

import javax.faces.FacesException;
import javax.faces.application.Application;
import javax.faces.application.ViewHandler;
import javax.faces.component.UIViewRoot;
import javax.faces.context.ExternalContext;
import javax.faces.context.FacesContext;
import javax.faces.event.PhaseEvent;
import javax.faces.event.PhaseId;
import javax.faces.event.PhaseListener;
import javax.servlet.http.HttpSession;

public class SessionPhaseListener implements PhaseListener {

private static final String homepage = "index.jsp";

@Override
public void afterPhase(PhaseEvent event) {
//Do anything
}

@Override
public void beforePhase(PhaseEvent event) {
FacesContext context = event.getFacesContext();
ExternalContext ext = context.getExternalContext();
HttpSession session = (HttpSession) ext.getSession(false);
boolean newSession = (session == null) || (session.isNew());
boolean postback = !ext.getRequestParameterMap().isEmpty();
boolean timedout = postback && newSession;
if (timedout) {
Application app = context.getApplication();
ViewHandler viewHandler = app.getViewHandler();
UIViewRoot view = viewHandler.createView(context, "/" + homepage);
context.setViewRoot(view);
context.renderResponse();
try {
viewHandler.renderView(context, view);
context.responseComplete();
} catch (Throwable t) {
throw new FacesException("Session timed out", t);
}
}
}

@Override
public PhaseId getPhaseId() {
return PhaseId.RESTORE_VIEW;
}
}


Once you created the class above that implements the PhaseListener, add this to you faces-config.xml. Note that the package name depends on your own Java packaging.


Formatting - Seams / RichFaces / JSF / xhtml

Formatting

While validation becomes simple with Seam, standard JSF validation messages are not very flexible. Although you can assign CSS classes to customize the look of the error message itself, you cannot alter the appearance of the input field that contains the invalid input. The following formatting tags allow you to decorate invalid fields with styles and messages. In addition to validation message formatting Seam provides
formatting components for applying labels directly to JSF input fields, optionally rendering HTML tags, and optionally rendering page fragments.

Formatting Examples

To use a Seam decorator, you first define how the decorator behaves using special named JSF facets. The beforeInvalidField facet defines what to display in front of the invalid field; the afterInvalidField facet defines
what to display after the invalid field, and the tag shows the error message for the input field; and the aroundInvalidField facet defines a span or div element that encloses the invalid field and the error message. You also can use the aroundField facet to decorate the appearance of valid
(or initial) input fields.
Now you can simply enclose each input field in a pair of
tags as shown below:

Simplifying Validation - Seams / RichFaces / JSF / xhtml

Simplifying Validation

When using Seam you can define validations directly on your entity beans that behave like JSF validators. These bean validators are provided by the Hibernate Validator framework (http://validatior.hibernate.org), but with Seam can be triggered as JSF validations.
Validation Examples

The Seam Booking example allows a user to enter her credit card number while booking a hotel. Credit card numbers have a common pattern and should be validated on input. The following example demonstrates how we can apply these restrictions using Hibernate Validator annotations: The @Length annotation restricts the String length to 16 characters while the @Pattern annotation specifies a regular expression restricting the String to digits only. Once these annotations are added to the entity, we can trigger them as validations during the JSF validations phase. Simply embedding the tag within the component ensures the validation is triggered. If an invalid credit card number is input, the user will be presented with the message defined in the annotation.

Dropdown Selection - Seam / Richfaces / JSF / xhtml

Dropdown Selection - Seam / Richfaces / JSF / xhtml


When developing JSF pages it is commonly required to associate the possible selections of a dropdown component with a list of objects or an enumeration of values.Unfortunately with standard JSF this requires quite a bit of glue code to achieve. Seam makes this simple through the tags. Even further when the tags are combined, you can directly associate JPA or Hibernate managed entities by simply binding a dropdown component to an entity association attribute.

Dropdown Tags

Dropdown Examples
The following example demonstrates directly associating a managed entity from a List of entities. The CreditCard class represents types of credit cards and the @NamedQuery allows us to load all CreditCard types from the data store.The Booking class is then be defined with a @ManyToOne reference to the CreditCard entity.

In order to load the list of credit card types, the Booking Action can define an @Factory method which initializes the list of CreditCard entities in the conversation context.

The method simply uses the named query we defined previously to load the entities from the current Entity-Manager instance. Note that our Seam-managed Persistence Context (SMPC) is named entityManager. If your SMPC is named something other than entityManager, you will have to configure the EntityConverter in components.xml (see the UI Namespace).

Finally, we can define a JSF component which simply binds directly to the creditCard attribute of the current booking instance.

The #{creditCardTypes} are loaded into the conversation context from the @Factory method we defined previously. The component allows us to iterate over the list of CreditCard entities and display the description by referencing the type variable. The tag ensures that the user selection is converted to an entity for association with the booking instance.


4 ways to pass parameter from JSF page to backing bean

4 ways to pass parameter from JSF page to backing bean


There are 4 ways to pass a parameter value from JSF page to backing bean :

  1. Method expression (JSF 2.0)
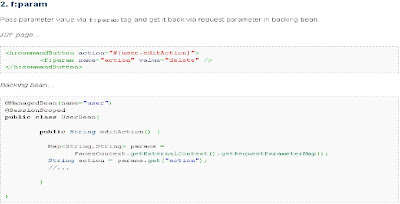
  2. f:param
  3. f:attribute
  4. f:setPropertyActionListener

Let see example one by one :


or to BackingBean as follows

FacesContext context = FacesContext.getCurrentInstance();
Map requestMap = context.getExternalContext().getRequestParameterMap();
String value= (String)requestMap.get("action");


From Other Resources :


Seam Apps Development - Steps to Create and Deploy a Prototype Application

Seam Apps Development - Steps to Create and Deploy a Prototype Application

Lets see how to do Rapid Application Development from existing database using Seam - Gen tool provided by seam

1, open command prompt and go to the location where seam is extracted
ex : D:\BonAppetit_Product\jboss-seam-2.2.0.GA

2, if you get problem :The JAVA_HOME environment variable should point to a JDK, not a JRE
solution : right-click "My computer", Properties ->Advanced Tab -> Environmental Variables,
and click "New" button to add JAVA_HOME environmental variable .

Provide following values:
a, variable name : JAVA_HOME
b, variable value : (for ex:) C:\Program Files\Java\jdk1.6.0_21

and click ok and do step-1 again .

3, type "seam setup" command and do as defined below :

[echo] Welcome to seam-gen :-)
[input] Enter your Java project workspace (the directory that contains
your Seam projects) [C:/Projects] [C:/Projects]
D:\BonAppetit_Product\Eclipse\Workspace_BonAppetit_Product

[input] Enter your JBoss home directory [C:/Program Files/jboss-4.2.2.GA]
[C:/Program Files/jboss-4.2.2.GA]
D:\BonAppetit_Product\jboss-5.1.0.GA

[input] Enter the project name [myproject] [myproject]
BonPro
[echo] Accepted project name as: BonPro

[input] Do you want to use ICEfaces instead of RichFaces [n] (y, [n])
n

[input] Select a RichFaces skin [blueSky] ([blueSky],
classic, ruby, wine, deepMarine, emeraldTown, japanCherry, DEFAULT)
emeraldTown

[input] Is this project deployed as an EAR (with EJB
components) or a WAR (with no EJB support) [ear] ([ear], war)
ear

[input] Enter the Base package name for your Java Classes
[com.mydomain.Bonpro] [com.mydomain.Bonpro]
com.Bonpro

[input] Enter the Java package name for your session
beans [com.Bonpro.action] [com.Bonpro.action]
com.Bonpro.action

[input] Enter the Java package name for your entity beans
[com.Bonpro.model] [com.Bonpro.model]
com.Bonpro.model

[input] Enter the Java package name for your test cases
[com.Bonpro.action.test] [com.Bonpro.action.test]
com.Bonpro.test

[input] What kind of database are you using? [hsql] ([hsql], mysql,
oracle, postgres, mssql, db2, sybase, enterprisedb, h2)
postgres

[input] Enter the Hibernate dialect for your database
[org.hibernate.dialect.PostgreSqlDialect] [org.hibernate.dialect.PostgreSqlDialect]
Hit Enter key (automatically generated one !!!)

[input] Enter the filesystem path to the JDBC driver jar [lib/h2.jar]
D:\BonAppetit_Product\jboss-5.1.0.GA\postgresql-8.4-701.jdbc4.jar

[input] Enter JDBC driver class for your database [org.h2.Driver]
[org.postgresql.Driver]
Hit Enter key (automatically generated one !!!)

[input] Enter the JDBC URL for your database [jdbc:postgresql:.] [jdbc:postgresql:.]
jdbc:postgresql:sample
(format : jdbc:postgreql:database name)

[input] Enter database username [sa] [sa]
postgres

[input] Enter database password [] []
postgres

[input] Enter the database schema name (it's OK to leave it blank) [] []
Hit Enter key (automatically generated one !!!)

[input] Enter the database catalog name (it's OK to leave it blank) [] []
Hit Enter key (automatically generated one !!!)

[input] Are you working with tables that already exist in the database?
[n] (y, [n])
y

[input] Do you want to drop and re-create the database tables and data in
import.sql each time you deploy? [n] (y, [n])
n

[propertyfile] Creating new property file:
D:\BonAppetit_Product\jboss-seam-2.2.0.GA/seam-gen/build.properties
[echo] Installing JDBC driver jar to JBoss server
[copy] Copying 1 file to
D:\BonAppetit_Product\jboss-5.1.0.GA\server\default\lib
[echo] Type 'seam create-project' to create the new project
BUILD SUCCESSFUL

Now, you had configured settings for the project. To create project , go to next step .

4, Now type 'seam create-project' and it will create a new project for you in the workspace location provided by you in the above step

5, Then type 'seam generate'

6, Now open eclipse -> New -> General - > Existing Projects into WorkSpace -> Select root Directory (as given by you in step - 3) -> Finish

7, Once imported, the project will automatically build and will get deployed in the JBoss server.

8. Now start the JBoss server and browse following URL :
(for ex :) http://localhost:8080/BonPro(Project name provided by you in step-3)
(format : http://localhost:8080/project-name)

Now we have created a sample prototype application
using seam-gen from an existing database !!!

Popular Posts